Installation of S-Locks

1. Assembly of the strap buttons
Screw the strap buttons with attached felt washer into the existing drill holes by hand using a 3 mm (1/8") allen key. Please ensure that the strap buttons are fully seated on the wood, if necessary, first rub the wood flat first. If there is no drill hole yet, drill it depending on the wood used.
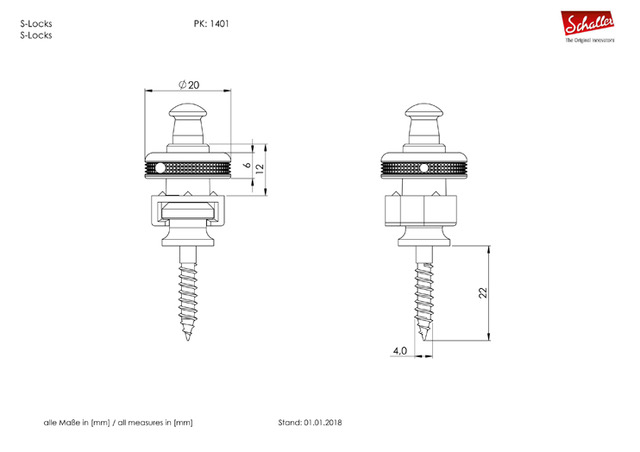
S-Locks in three different dimensions
L = male thread 4.5 mm, inside 3.2 mm length 27 mm- We recommend choosing the strap button first to match the size of the existing hole in the guitar. If the hole is too big or too small, please choose a different strap button or reduce, close, re-drill or extend the hole.
- If necessary, countersink separately in the area of the outer lacquer layer to prevent the lacquer from flaking off when screwing in the strap button.
- Carefully screw in the strap button into the wood and, if it is too tight, unscrew it again and gradually drill up the drill hole.
- If the strap button is too easy to screw in, then reduce or close the hole and drill again appropriately.
- Tighten the strap button "hand-tight" to the instrument body. Do not continue by force. The wood may break, flake off the paint and tear off the strap button.
» Please check the secure fit of the strap button in the wood regularly and retighten the screw if necessary or reduce or close an enlarged hole as described and re-drill.
» Do not change the factory dimensions of the S-Locks (a change to the purchased item is not a material defect - see Schaller GTC). Any changes to the original product dimensions (e.g. widening diameters, shortening thread lengths, etc.) will inevitably result in damage to the component and thus the loss of the protective function of the S-Locks.
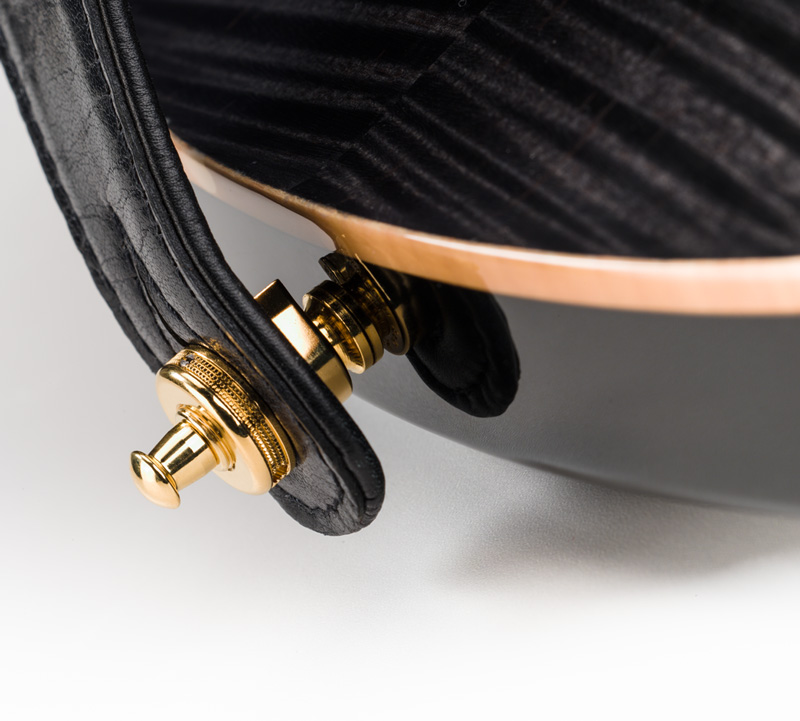
2. Assembly of the locks on the belt
Insert the lock through the hole in the strap. The lock is on the inside of your belt and the threaded hole for the lock-wheel on the outside. The open side of the lock (U-shape) points in each direction to the belt, so that the instrument can later safely hang in the lock.
If the hole in the belt is too narrow or there is only one slot in the belt, please cut away a piece of the belt in a circle (10 mm) that the thread can be easily pushed through the lock without the leather parts standing upright. Otherwise, the lock wheel can not be securely fastened and the lock and lock wheel can disengage.
If necessary, punch a hole of 10 mm in the leather strap with a round hole punch tool, then our S-Lock lock fits exactly through the leather strap and our lock wheel can be optimally screwed on and locked.
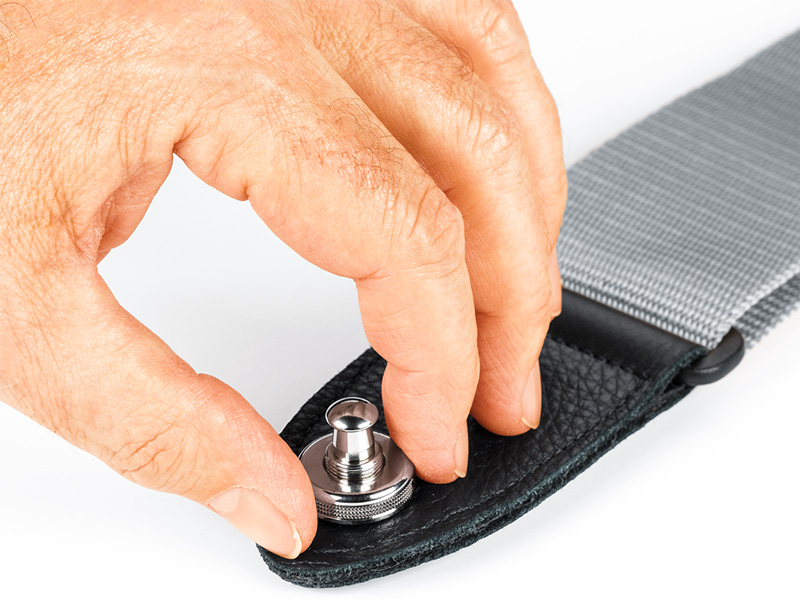
Turn the lock-wheel clockwise onto the thread of the lock. The flat side must point to the belt; the rounded side up! Make sure that the small set screw in the lock-wheel is not screwed inwards and destroys the thread.
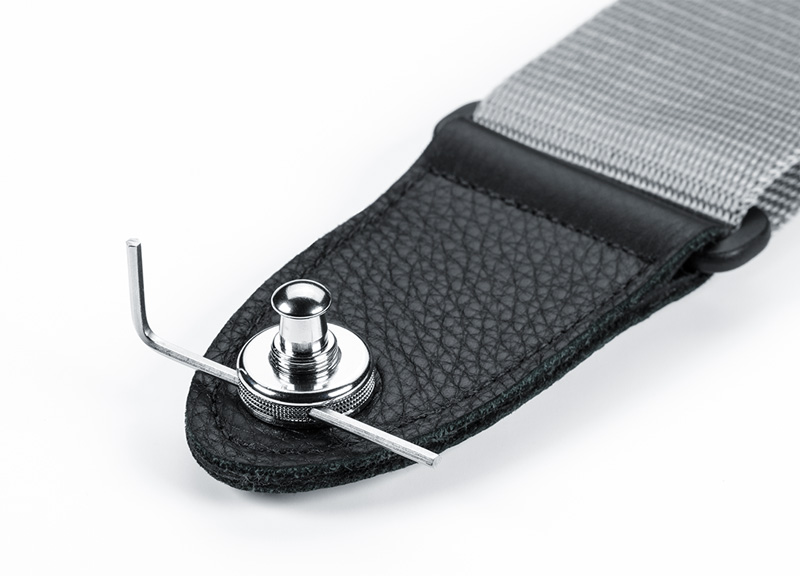
Use a 2 mm (5/64’’) Allen key or small screwdriver through the 2-hole mount for an even tighter fit of the lock-wheel for maximum grip.
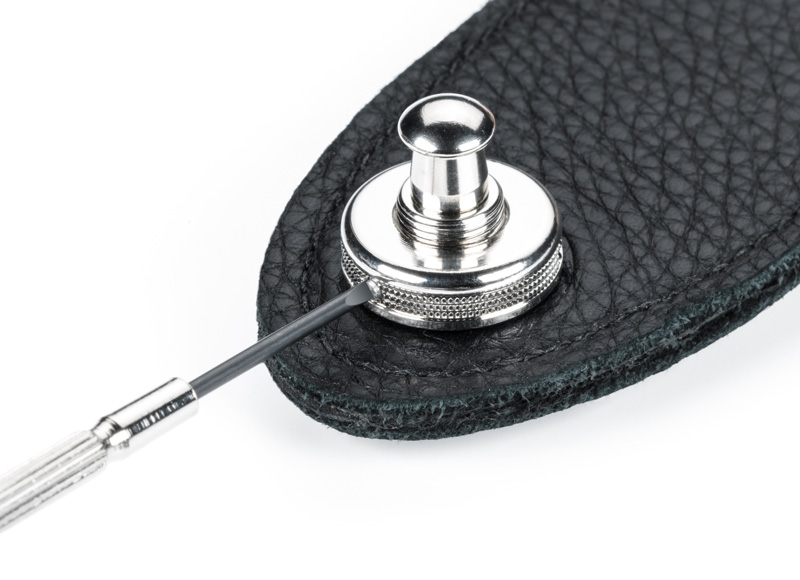
Screw in the slotted set screw with cone dome (2.5 x 5 mm) with a screwdriver until it stops. This will block the thread and the lock wheel can no longer loosen.
Tip
- Please use the allen key or thin screwdriver to tighten the lock wheel very firmly (level 2) before screwing in the micro screw (level 3).
- This gives the lock a firm hold and the 3 tapered pins on the inside of the lock penetrate the leather belt and prevent the lock from twisting.
- Guitar straps made of leather, imitation leather or other materials compact when pressed together. Therefore, the lock-wheel must be tightened again after some time at the beginning.
» Before retightening, always loosen the small grub in the lock-wheel first, otherwise the thread will be damaged.
» By retightening the Lock-Wheel, the three small pins on the lock press into the surface of the strap and prevent the lock from accidentally twisting on the strap. To avoid this, please make sure that
- you have a circular hole in the belt and, if necessary, punch out what exactly corresponds to the diameter of the threaded neck of the lock;
- press the leather strap as tightly as possible in the area of the lock and lock wheels in advance so that you can then tighten the lock wheel more easily and firmly on the lock;
- from time to time you tighten the lock wheel again and again until the leather strap is maximally compressed at this point. Always loosen the micro screw beforehand so as not to destroy the thread.
- Check the secure seating of the set screw regularly and retighten the set screw if necessary.
- To unscrew the lock-wheel, simply loosen the set screw; the thread remains functional, it cuts through the lock-wheel again "free".
- Before loosening or retightening the lock-wheel, always unscrew the set screw until it no longer points inwards and damages the thread!
4. Functionality of the S-Locks
- Regularly check all parts for possible wear.
- Retighten all screws in a timely manner.
- When playing, always check that the lock is securely seated on the strap, that the lock is locked into the strap button, and that the strap button is securely screwed into the instrument.
- Please always make sure that the lock is engaged in the strap button, the lock is attached to the belt in such a way that the strap button is secured in the U-shape of the lock and that the instrument does not rotate.
Technical drawing