
Hannes®-Bridge
Everything a guitar builder needs to know about installing Schaller's new Hannes® bridge can be found on this page.

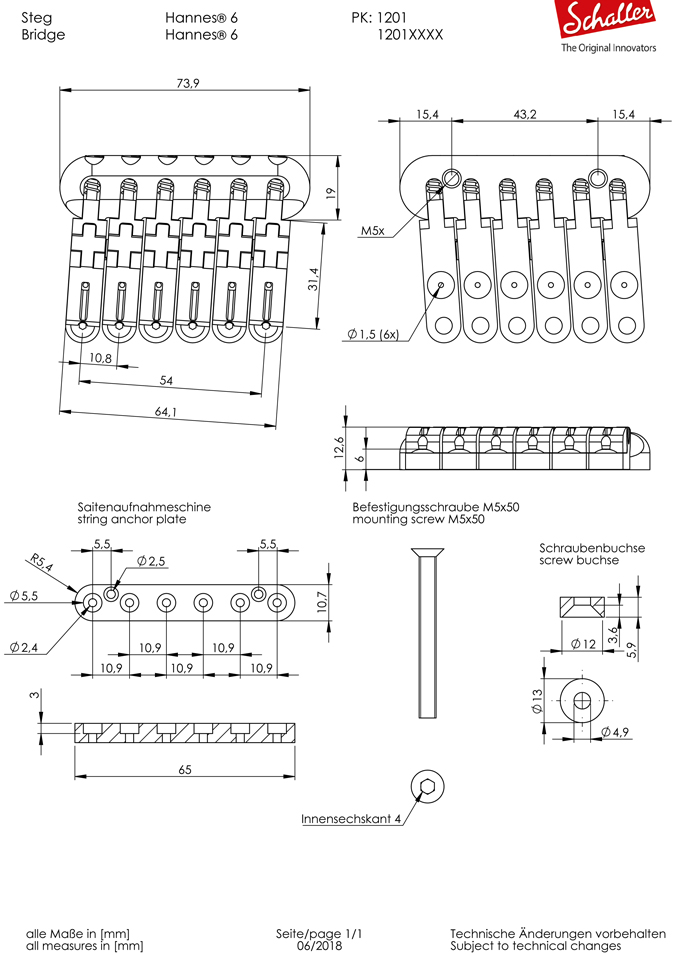
1. Technical drawings of Hannes® 6, 7 and 8


2. Installation of Hannes® 6, 7 and 8
Determination of the correct intonation point for standard electric guitars
1.) For guitars without compensated saddle position e.g. Gibson, Fender etc.
- Measure the distance from the front edge of the saddle to the middle of the 12th fret
- multiply by 2
- Add 0.5 mm to this
- the result is the measure of the intonation point of the high e-string
If you draw a line parallel to the frets through this point, you get the intonation line.
2.) For guitars with compensated saddle position e.g. Tom Anderson, PRS, Buzz Feiten etc.
- Measure the distance from the front edge of the saddle to the middle of the 12th fret
- multiply by 2
- Add 2.0 mm to it
- the result is the measure of the intonation point of the high e-string
If you draw a line parallel to the frets through this point, you get the intonation line.
3. Installation templates of Hannes® 6, 7 and 8


Tools, machines and materials required:
- Transparent paper for template
- Drill bit for bridge mounting: 5,5 mm / 13,0 mm
- Drill bit for string ferrules: 6,0 mm
- Drill bit for string anchor plate: 1,5 mm
- Rounting machine for string anchor plate: 11,0 mm (10,0 mm)
- Flat drill
- Box column drill
- Hand router
The scope of supply includes the following accessories:
- 1 piece String anchor plate
- 2 pieces Wood screws LK 2,2x9,5
- 2 pieces Mounting screws SK M5x50
- 2 pieces Screw sockets (13,0 mm)
- 3 pieces Allen Keys (2,0/2,5/3,0 mm)
Schaller Hannes® Piezo cable layout and earthing
A connection must be formed between each of the string sockets (or at least one in every two) and the potentiometer or the switch, either by soldering or crimping.


Note
Our Schaller Hannes® bridge can be fitted to any guitar, provided that the body is flat at the point where the bridge is to be placed.
Begin by setting the Schaller Hannes® bridge up in such a way that the intonation screws are in the mid-way position (~ saddles are flush to the bridge).
The front edge of the high E-string's saddle must match up to the mensur line (place it accordingly).


Individual steps

First mark out the center axis and the mensur on the body so that the template for the Hannes® bridge can be positioned exactly right.

Do this by laying a straight ruler of sufficient length on each side of the fretboard and marking the continued outline of the neck onto the body.

Using the two lines, ...

... mark out on the guitar body the center axis required to position the bridge.


The mensur point is obtained by multiplying the measurement...


... from the nut ...

... to the 12th fret (middle of the fret) by two; In our example, this is 323.85mm x 2 = 647.7mm, i.e. typical mensur for Fender instruments.

The best thing to do is to use a tape measure to mark out the mensur on the central axis on the guitar body.

Then extend the mensur point left and right (based on the central axis at a 90° angle to the center axis).

Now position the template on the axial cross you have drawn and fix it with adhesive tape.


The line marked on the template must run over the axial cross.

Use a sharp flat drill to mark out the required drill holes.


Once you have removed the template, you can drill the holes for the bridge to be mounted.

Now drill the holes for fixing the bridge and for the string ferrules (on the front of the body). In order to drill the holes exactly, a box column drill is absolutely necessary.

Drill bits with a centering tip should also be used - if available - in order for the holes to be drilled more precisely.

A 5.5mm drill bit is required for the bridge mounting screws, and a 6mm bit for the string ferrules.

Once the drilling work on the front of the body is completed, ...


...the two holes for the bridge mounting screws must be drilled out to 13mm diameter and 6mm depth on the rear of the body...


...to accomodate the two sockets for the two flat head screws. At this point, you can also check the toleranced dimensions for the bridge mounting screws.


If the bridge mounting screws are too long, they can be shortened using a metal saw and deburred using a file.


The bridge can now...

... - as a test - be fitted in order ...


... to check that it sits correctly and that the mensur is correct.


Thanks
We would like to take this opportunity to thank the guitar maker Thomas Amberger, from the Oberpfalz in Bavaria, for helping us to put together these installation instructions!